Skitch is a great tool for producing simple infographics. Best of all, it's free and works on Windows, Android and Apple OSs.
Step 1: Do A Little Research
If you're using Skitch it's also worthwhile installing Evernote as the two have been designed to work together. Evernote lets you make a note of any content you find on the web, search through it and access it anywhere.
Take down any information that you think might be relevant to your project and save it in Evernote, you will need it later.
Step 2: Get Skitching
Skitch allows you to annotate and highlight images. It allows has a very intuitive screen-grab tool which lets you capture and annotate content straight from your browser.
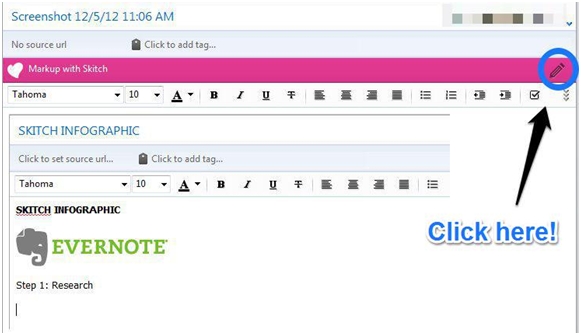
To start working on an image click the 'Markup with Skitch' icon:
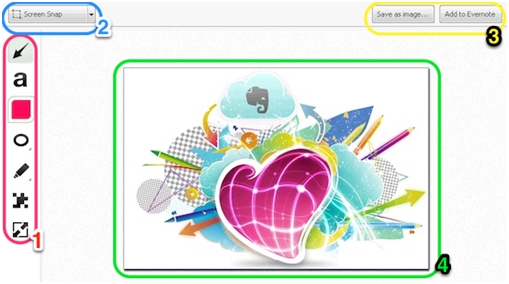
- Toolbar: These are Skitch's annotation tools, in descending order: arrows, a text, colour, outlines, highlighter, pixilation function, and crop tool.
- "New" menu: Click to capture a new image or select an existing image you want to annotate
- Save Options: Click to export your Skitch Note as an image file, or to save your Skitch Note to your Evernote account.
- The Image: Use the tools to make it more informative!
Step 3: Save the annotated images
You can just save them to My Pictures or to Evernote if you are using it.
Step 4: Arrange and export as a .jpeg
Now simply arrange your annotated images in your chosen image editing software (paint will do), export as a .jpeg and voila! - your very own infographic.
Step 5: Share your infographic!
Upload the complete infographic to your blog or use Evernote's in-built share function to upload it to a social network.
A word of warning: Whilst simple infographics can add extra value to content as shown with the images above (all created in Skitch) don't expect them to produce miracles. Sadly, high quality infographics like those that are picked up by sites like Mashable take time and money and sadly no free tool can produce them.


