Google's Authorship markup and the rel=author tag has really taken off since introduced almost a year ago. Many authors have linked their content to their Google Profile and the trend is growing quickly. The example below shows the author's profile picture linked to the page or post. It really makes them stand out and adds credibility. Go to Google search and type in "what is rel=author?" The search results bring up many of the experts who have written posts or articles about rel=author with their head shot pictures. Do you want to appear in the search results like they do? Well you can if rel=author is setup correctly. This post provides instructions on how you can setup rel=author for yourself and others at your business using Google+ and WordPress. 
Steps to take in setting up your rel=author profile in Google+
You need to have a Google+ account so that you can link your profile to your WordPress website or any other websites that you author a post or article on. Go to Google+ and create your account. If you already have a Google account, login and create a Google+ account.
Google+ Profile page
Once you have created your Google+ page, click on "Profile" and "Edit profile". Fill in the information to build your profile page. Most importantly- add a nice "head shot" photo of yourself. This will be the photo used when your blog posts or articles appear in Google's search results. There are many great blog posts on building your Google+ profile. Go to Google and search for them. For this post, we want to concentrate on rel=author setup.
Adding Contributor links to your Google+ profile
In your Google+ Profile at the bottom of the page you will see "Contributor to". This is a great feature. Add your website first and any other websites or blogs you write articles for. For example, elSue quest posts on Search Engine People. We did the following so that those posts will show up in the search results with the Author profile. All you need to do is:
1. Click on "Contributor to" and the box will open up
2. Add the title of the website or blogsite
3. Add the link to the page. Be sure it is formatted with the https://www. (see example below)
4. Save and repeat byclicking on "Add custom link"
Note: Guest posters and Contributors on Search Engine People get an author box and a dedicated author page on the site. Pretty cool!
WordPress and the Yoast plugin
A business can decide whether it should be the CEO/Owner or the people who write the articles to show up in the search results. We are using Genesis and the Yoast WordPress plugin. Yoast handles rel=author and makes it so you can attribute the home page to one author - it also does rel=author for individual authors.
For example, there are the two of us at elSue who write blog posts. We each have our rel=author links setup with our Google+ Profiles. We can select one of us to represent elSue for the home page - while we still get credit for our individual blog posts. To add User Profiles using WordPress and the Yoast Plugin, do the following:
- Go to the WordPress Dashboard
- Under "Appearance" click on "Users" and "All Users"
- Click on "Add New" and add your profile and any other people at your business who you want to have a user author profile.
- Click on "Edit" to open the profile page
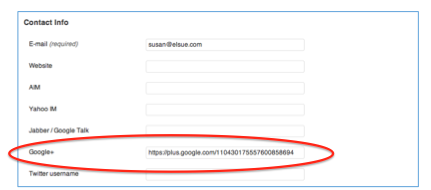
- Add your Google+ profile link into the Google+ field
Fill in all of the profile information - add your website, and SEO information such as Title to use for Author page and and Meta Decription, which can help with your Google rankings. I'll do mine later. For this test, I added my Google+ link only.
Google's Rich Snippets Testing Tool
Google's Rich Snippets testing tool will tell you if it worked or not. Go to Google Webmaster Tools and enter your web page URL and preview.
Yeah! It Worked. After you finish and your test results are good, go and do some searches to see if your author photo and profile show in Google's searches. It may take a while to for you to show up in Google's search results - be patient - as I will try to be!
Google's Basic rel=author information
Not everyone has found Google's basic instructions called "Author information in search results" on WebMaster Tools that helpful. I read some good blogs, asked my Partner Ellen, who is more of an expert on topics like this, and found a couple of excellent videos on YouTube such as "How to Display Author Profile Picture in Google Search Results".
Please let us know if you have any tips or suggestions on the process. Google is constantly changing how things are done and we try our best to keep on top of their changes. Comments from the experts are always welcome!
If you liked this, you'll love 5 Page Quality Indicators That Can Outweigh PageRank


