...When you Can't Even use a DataLayer!
Have you ever needed to change the URL of your pages tracked by Google Analytics, so you can better understand how your content is performing?
For example, sometimes your site may have been built so that all of your product pages or blog posts are directly on the root of your domain, instead of being in a /products or /blog folder.
When you try to do analysis on how these pages are performing, it can be challenging, because it's not easy to see these pages grouped together.
You could use Content Grouping to see how your content is performing, but personally I find that Content Grouping has some limitations. Sometimes it's better just to edit the URLs when they are tracked by Google Analytics.
This post is going to show you how to change the URLs for a section of your site in Google Analytics using Google Tag Manager
FROM: www.example.com/blog-post
TO: www.example.com/blog/blog-post
Changing URLs in Google Analytics
You may have already been changing the page URLs tracked in Google Analytics, since you've been able to do this for a long time now. You might have this already built into your website code. For example:
In Google Universal:
But how do you migrate the ability to edit URLs in Google Tag Manager??
Time for a Case Study!
We have a client whose blog posts are built right onto their root domain. It would be disruptive and potentially expensive to change all the URLs to be in a /blog folder. But we need to track the performance of the blog posts, and the Content Grouping function isn't quite going to do the job.
So we decided to change all the blog URLs to be tracked as being in a /blog folder which doesn't actually exist.
Since nothing is ever as easy as it seems on paper, we had the added challenge of not being able to add dataLayer code before the Google Tag Manager script. This is a big problem! We've found that GTM behaves unpredictably at best - or doesn't work at all - when the dataLayer is inserted after the GTM code.
So we had to get this done without using a dataLayer.
.
How to Change Page URLs Using Google Tag Manager Without Using a dataLayer
The implementation is actually pretty simple.
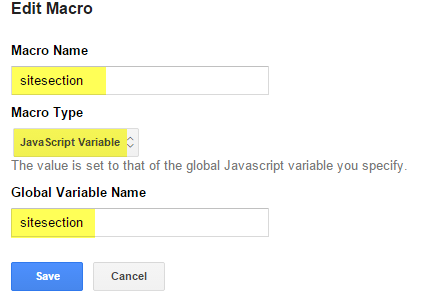
However you identify your blog posts, the important part is that you have a JavaScript variable (in this case sitesection) that is only set when the visitor is looking at a blog page. Or whatever it is you're tracking.
Next, we use Chrome's Console to make sure it's working before we go further. This can save you stress later. Just type in sitesection, or whatever your variable is called. You just want to make sure that the variable is being set on the pages you want to change, and not set on the pages you want to keep as they are.
Now let's assume you already have a Google Analytics tag set up in GTM. It's best to COPY the existing tag. You can easily do this by clicking the "Copy this tag" button at the bottom right. You might need to hit "Save" after you hit "Copy" to make this work.
You are copying the tag because you're going to run 1 tag for the pages where you want to change the URL, and 1 tag for all the pages on the rest of the site. Rename this Analytics tag something clear, so you know what it does.
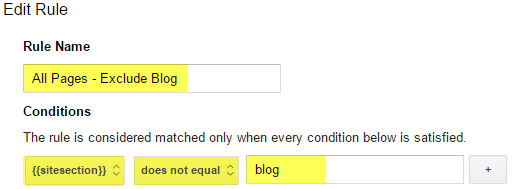
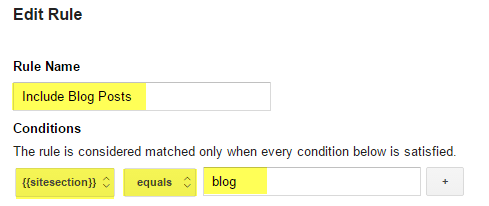
To make this work, you need to change the Firing rules for the 2 Analytics tags.
On the Analytics tag that's going to track the whole website, you'll need to exclude the blog pages:
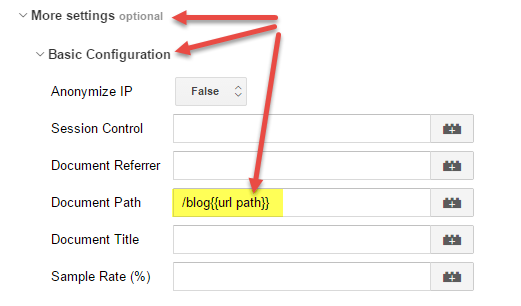
Finally - edit the Analytics tag that's going to track only the blog pages. Open up "More Settings > Basic Configuration" and take a look at the "Document Path" field. This little field lets you change the URL of your pages.
In this case, we want all the blog posts to be tracked in a "/blog" folder that doesn't actually exist. So we're going to enter /blog, then pull in the macro for the original path to track the rest of the URL.
This will add /blog to the beginning of the URL for all your blog pages.
Save & Publish
Remember to hit "Save" on your Tag and "Publish" your container before leaving Tag Manager.
Also remember you should do a hard refresh on your site (or clear your cache) before checking to make sure it works.
Do some QA
Also make sure you do some QA to make sure it's working - use the excellent Tag Manager Debug feature.
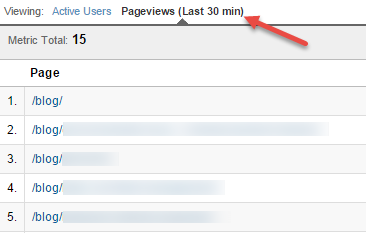
If all goes well, you should start seeing views in your Real Time reports within minutes:


