WordPress is very popular as a blogging platform, but it is also an excellent solution for creating basic websites for a business, organization, or other project. A website built on WordPress is extremely flexible, and easy for anyone to update.
Even if your website does not need a blog, WordPress is still a great CMS platform to use - it is simple to setup and customize, yet has a wide variety of plug-ins and options you can use to customize it as you need.
For the purposes of this tutorial, I will assume that you already have purchased a domain name and web hosting and are familiar with he features in your hosting control panel.
Step 1: Install WordPress
If your web host offers it (look in your control panel), you can use Fantastico or Quick Install to quickly and easily install WordPress on your domain. Here is a screenshot showing how easy it is to install in just one click:

If your hosting company does not offer a quick install feature, just go to WordPress.org to download the software, then follow the simple instructions for the famous 5-minute installation.
Once WordPress is installed on your domain, login to the admin panel and proceed to step two.
Step 2: Learn About The Basic WordPress Design
The colors, layout, and graphics on your website are controlled by a WordPress theme.
The default theme for WordPress, called Twenty Ten, is an excellent theme to use for a basic website because it automatically creates a navigation menu at the top with all of your pages listed.
If you want a different design, there are hundreds of different themes you can choose from, but for this guide I'll assume you're using the default theme.
This graphic shows the main areas of the design:

Step 3: Customize Your Site Title And Tagline
Go to Settings > General to change the text of your site title and tagline.
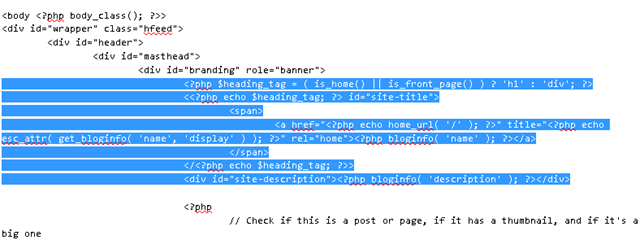
If you want to remove the site title and tagline completely, go to Appearance > Editor > Footer and delete the code highlighted in this screenshot:

Step 4: Customize Your Header Graphic
Go to Appearance > Header to select a different header graphic or upload a custom graphic (I recommend uploading a custom graphic).
Step 5: Set Your Homepage
Setting up your website's homepage requires two steps: creating a new page, then setting this page to be your homepage. To create the new page, go to Page > Add New. To set this page as your homepage after you create it, go to Settings > Reading and select the correct page as shown in this screenshot:

Step 6: Add More Pages
To add the rest of the pages you want on your website, go to Page > Add New.
Step 7: Customize Your Top Navigation Menu
A) Start by going to Appearance > Menu and creating a custom menu:

B) Then set your custom menu to display in the "Primary Navigation" area on your site (this setting is at the top left of the same page).
C) Then add pages to your custom menu:

D) Finally, click Save Menu when you are done!
Step 8: Customize Your Right Sidebar
It's super easy to update and customize your site's sidebar using widgets. Start by going to Appearance > Widgets. You can drag and drop individual widgets in and out of the Primary Widget Area, which is your sidebar.

You can add dynamic and static text, images, menus, and more!


WordPress is a fantastic platform, these steps are easy and clear, good work!
http://WordPressThemeAdvisor.com reviews popular WordPress themes and offers detailed explanations of each along with which type of business the theme is appropriate for.
Adam, in there could be one more step I may suggest that you customize the permalinks to %postname% which is a help with seo.
Eileen, agree with you regarding changing the permalinks. Installing All in One SEO Pack to optimize title tags is also important for SEO.
I like the face you gave the PHP to remove the title, but wouldn’t that do harm to your Google indexing though?
Little or none. The code I showed to remove would remove the site name in the H1, not the page title. H1 headers do have some impact on SEO, but only very minimal.